
Roman Kropachek Editor and Tech Approver With over two decades of experience in IT and marketing, Roman Kropachek is an essential figure in content verification at Macgasm and an invaluable asset to the editorial team. As an editor and tech approver, Roman is responsible for reviewing and fact-checking articles before publication. His commitment to accuracy and detail guarantees that all content meets the high standards of trustworthiness Macgasm's readers have come to expect over the years.
Why Trust UsAt Macgasm, we’re dedicated to bringing you insightful Apple-centric content that adheres to our comprehensive editorial guidelines whose purpose is to maintain the utmost accuracy, relevance, and impartiality in everything we publish. This commitment to preserving the integrity of our content is shared across our team, from expert writers to seasoned editors.
macOS is an operating system with super intuitive navigation, sorting, and file system organization. Even for non-tech-savvy users or users coming from a Windows environment, it’s fast and easy to get used to locating your files, folders, and apps.
In fact, macOS provides users with a lot of native functions that help users locate them using file names, dates, file types, and more. This article goes over all the ways you can find files on your MacBook.
Can’t find needed files? Go straight to data recovery section ⤵
| Method | When It’s Most Useful |
| 🕓 Scan your Recents Folder | When you’re looking for a file you recently opened or created |
| 🗃️ Browse Your Default Folders | When you haven’t customized your folders |
| 🏴 Use Terminal Commands | When you want to know the the location path of your file or folder |
| 🔎 Utilize Finder Advanced Search | When you want to use a lot of parameters for searching |
| 💡 Use Spotlight Queries | When you need to quickly narrow your search |
Table of Contents
By default, your files and folders are stored in the folders within your user’s directory. Your main folders (Documents, Desktop, etc.) are called “Smart Folders” and they automatically organize files based on criteria that you can specify with searches. You can also create your own Smart folders based on your needs.
The main tool you can use to browse files on Mac is Finder – and its organization system can be accessed by different apps and functions on your Mac. We’ll be exploring this system (and how to efficiently navigate through it) below.
5 Methods to Search for Files and Folders On a MacFortunately, there are multiple ways to find all files and folders on a Mac. Some of them require manually navigating, while others are as convenient as using hotkeys to pull up a quick search function.
If you suspect that you can’t see your files because they’re hidden, there’s an easy way to show them.
macOS makes it super easy to find files that you were recently working with or you recently created, especially if you forgot where you saved them. It’s also sorted by “Date Last Opened” so you can easily pick up work where you left off. Here’s how to use it:
![]()
Step 1. Open Finder by clicking its icon on your Dock.

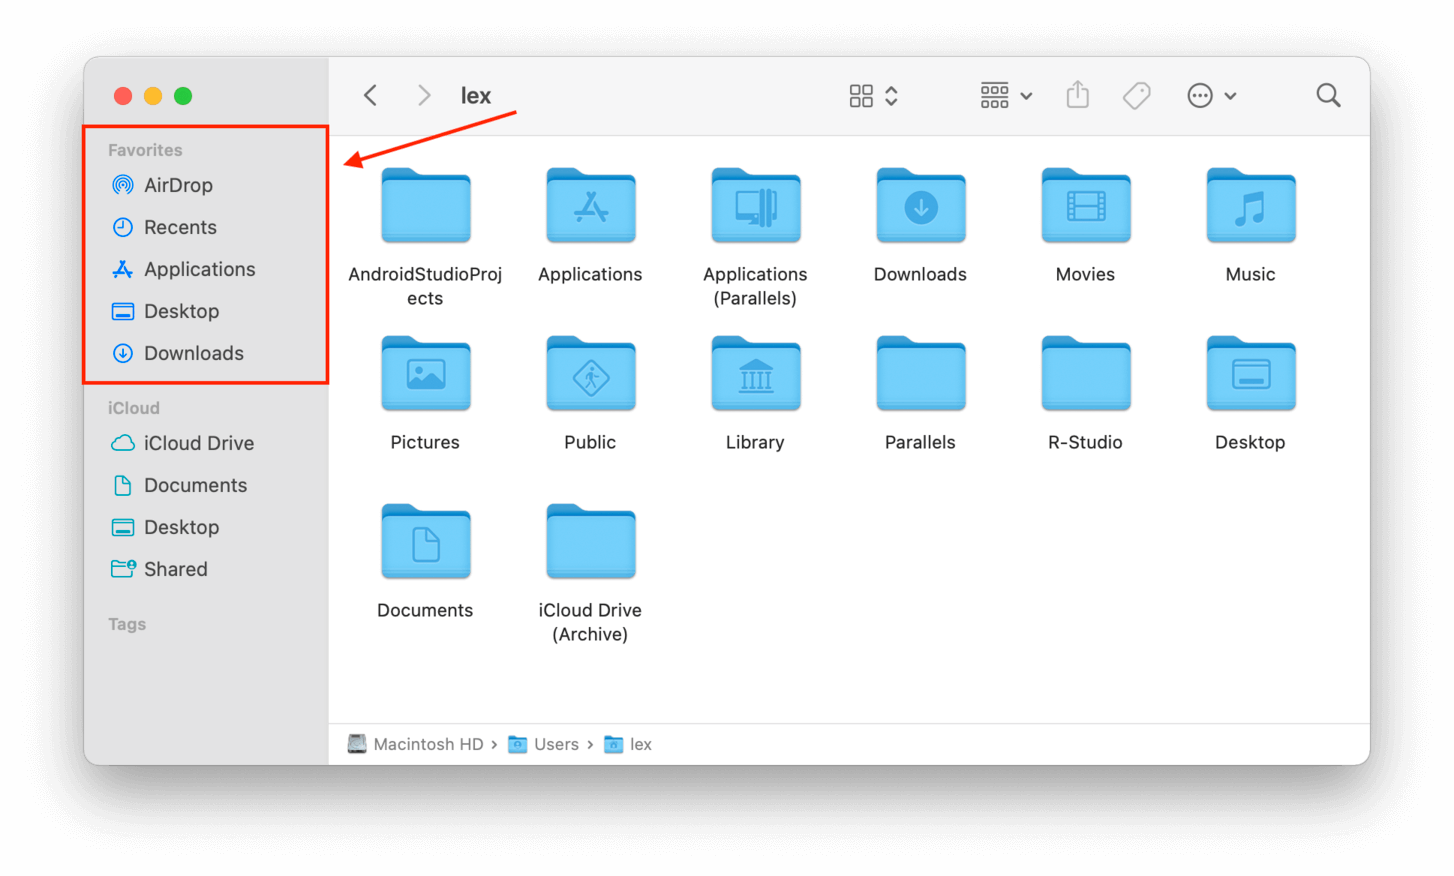
Step 2. Click the “Recents” folder on the left sidebar below AirDrop and within the Favorites category.
You can actually customize what folders appear in your Favorites sidebar by selecting them through Finder Preferences. Here’s how to do it:
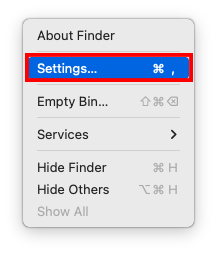
Step 1. Make sure Finder is open. Then on the Apple menu bar, click Finder > Settings .
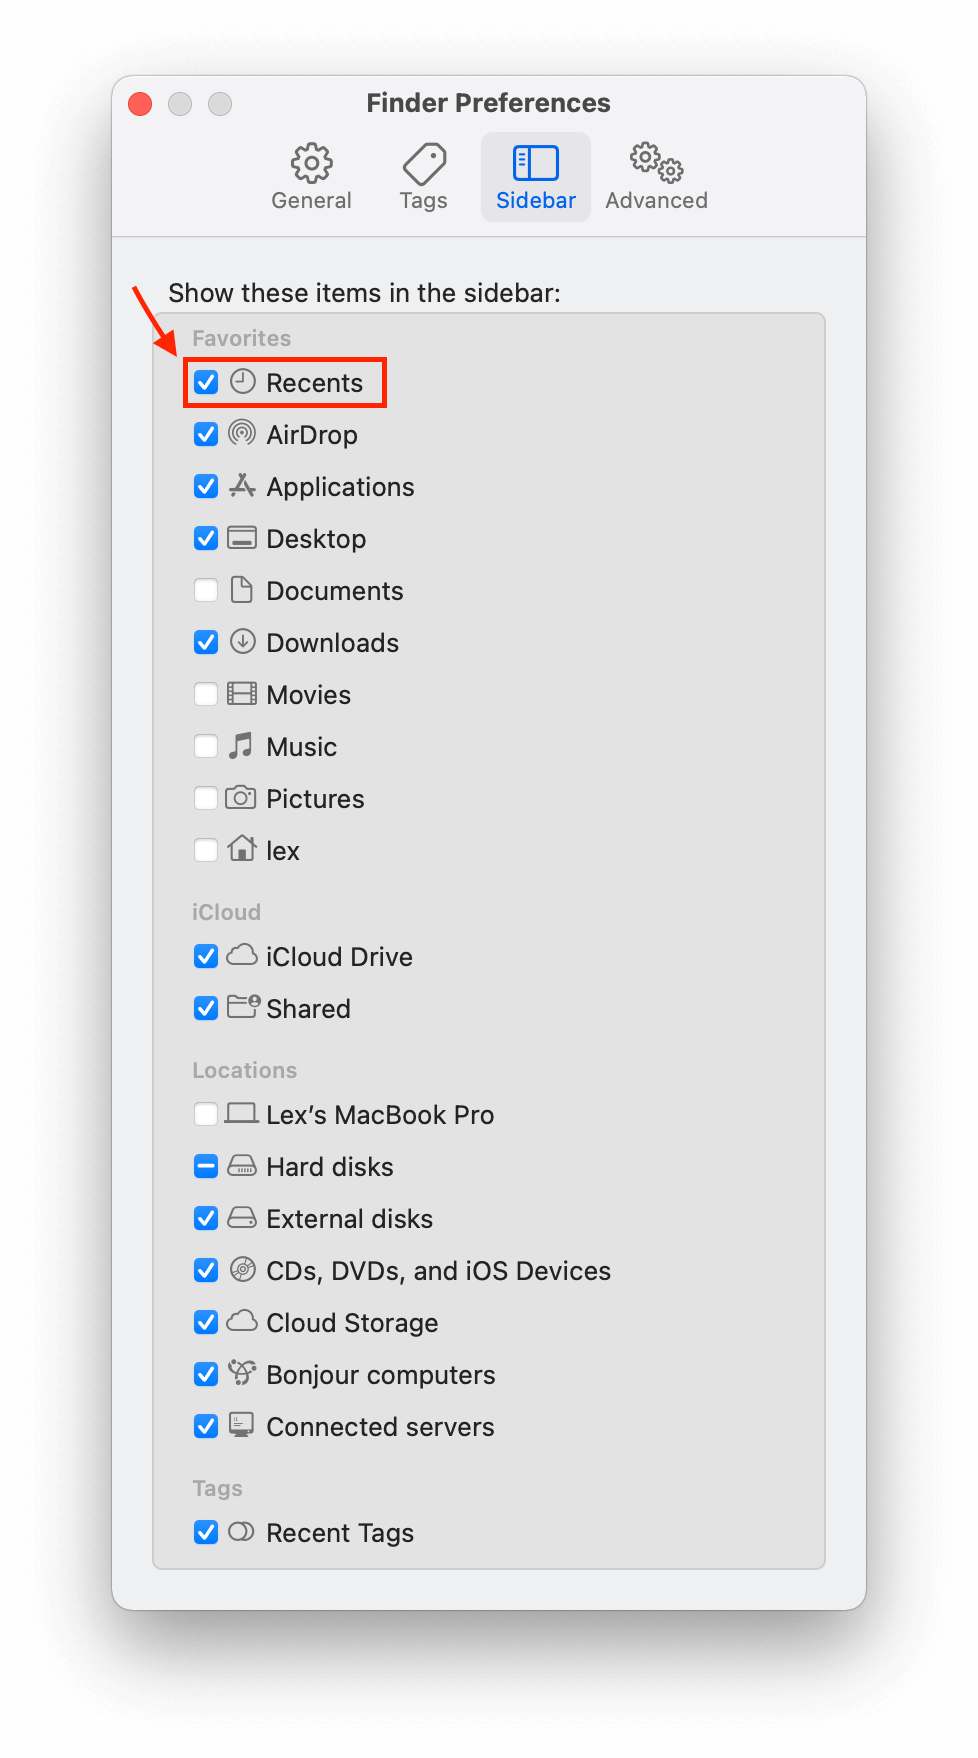
Step 2. In the Finder Preferences window, tick the box to the left of the “Recents” option.
macOS already sets up default folders to make it easier for you to organize files by type – and they are usually pinned to your favorites sidebar within Finder so you can quickly navigate to them.
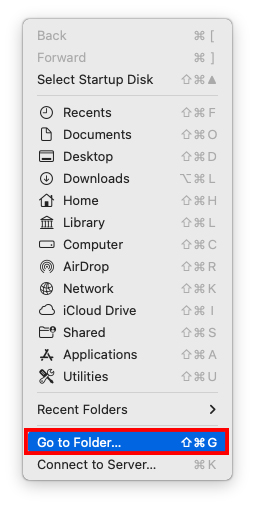
Aside from your Finder sidebar, there are other ways you can access these folders as well. You can use the Finder > Go menu:
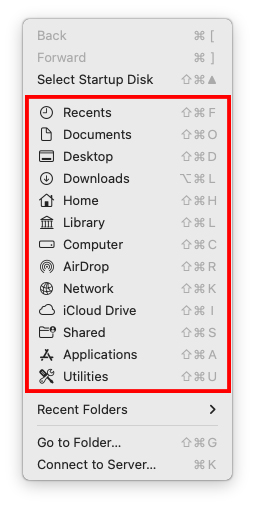
And you can even navigate directly to folder paths by using the Finder > Go to Folder function. Simply Open the Finder > Go menu again on the Apple menu, but this time click “Go to folder” which is the second to the last option in the Go menu. This will open a window where you can type the folder’s path directly.
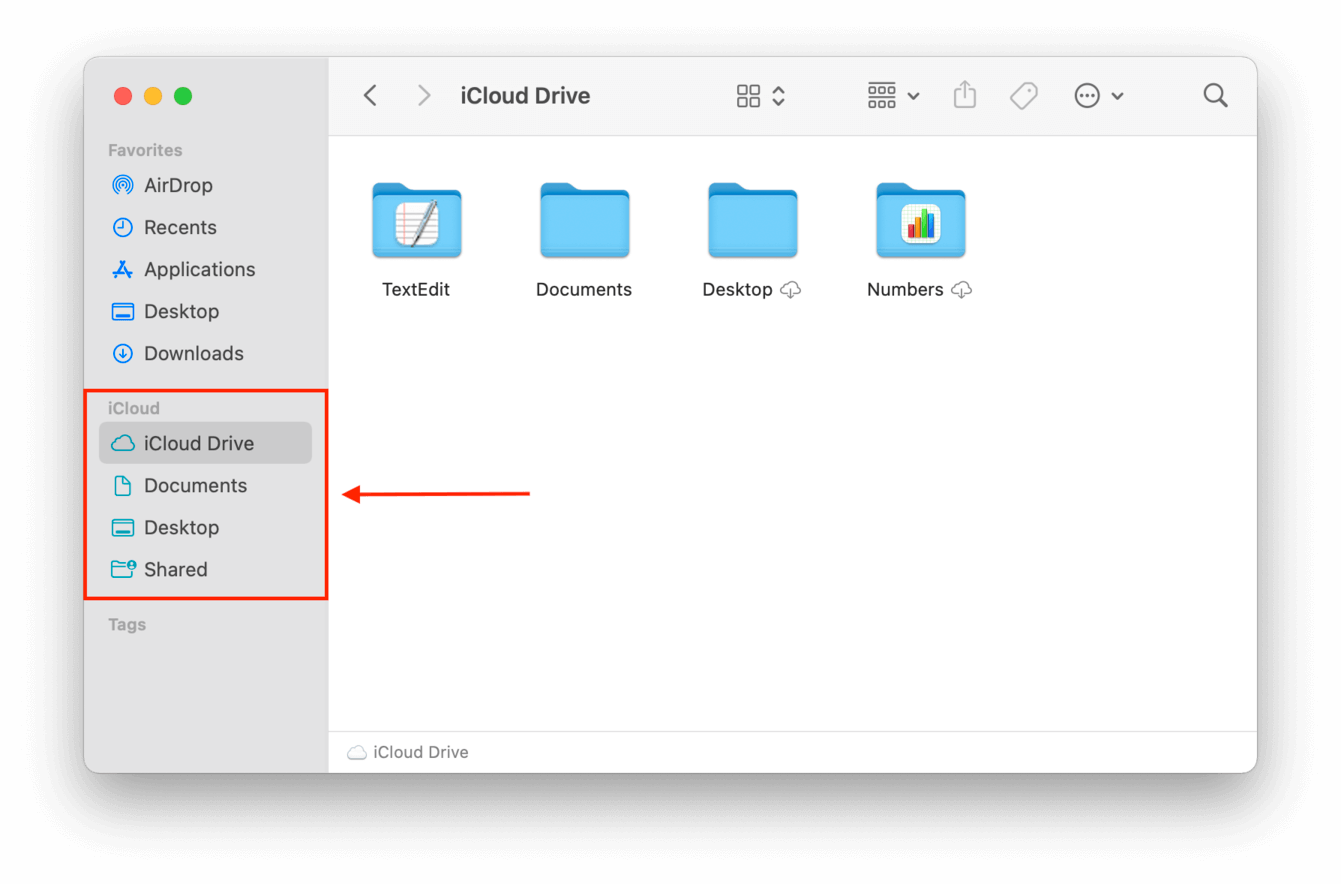
If your files are missing from their default folders, you might find them in your iCloud folder. When iCloud detects that your local Mac storage is running out of space, it may delete files locally and save them to iCloud. iCloud has its own section in the Finder sidebar so you can easily access it from anywhere in your file system.
macOS Terminal app is a command tool that lets you access your Mac beyond what the graphical user interface shows you. We’re going to use two useful Terminal commands to folders and files on a Mac.
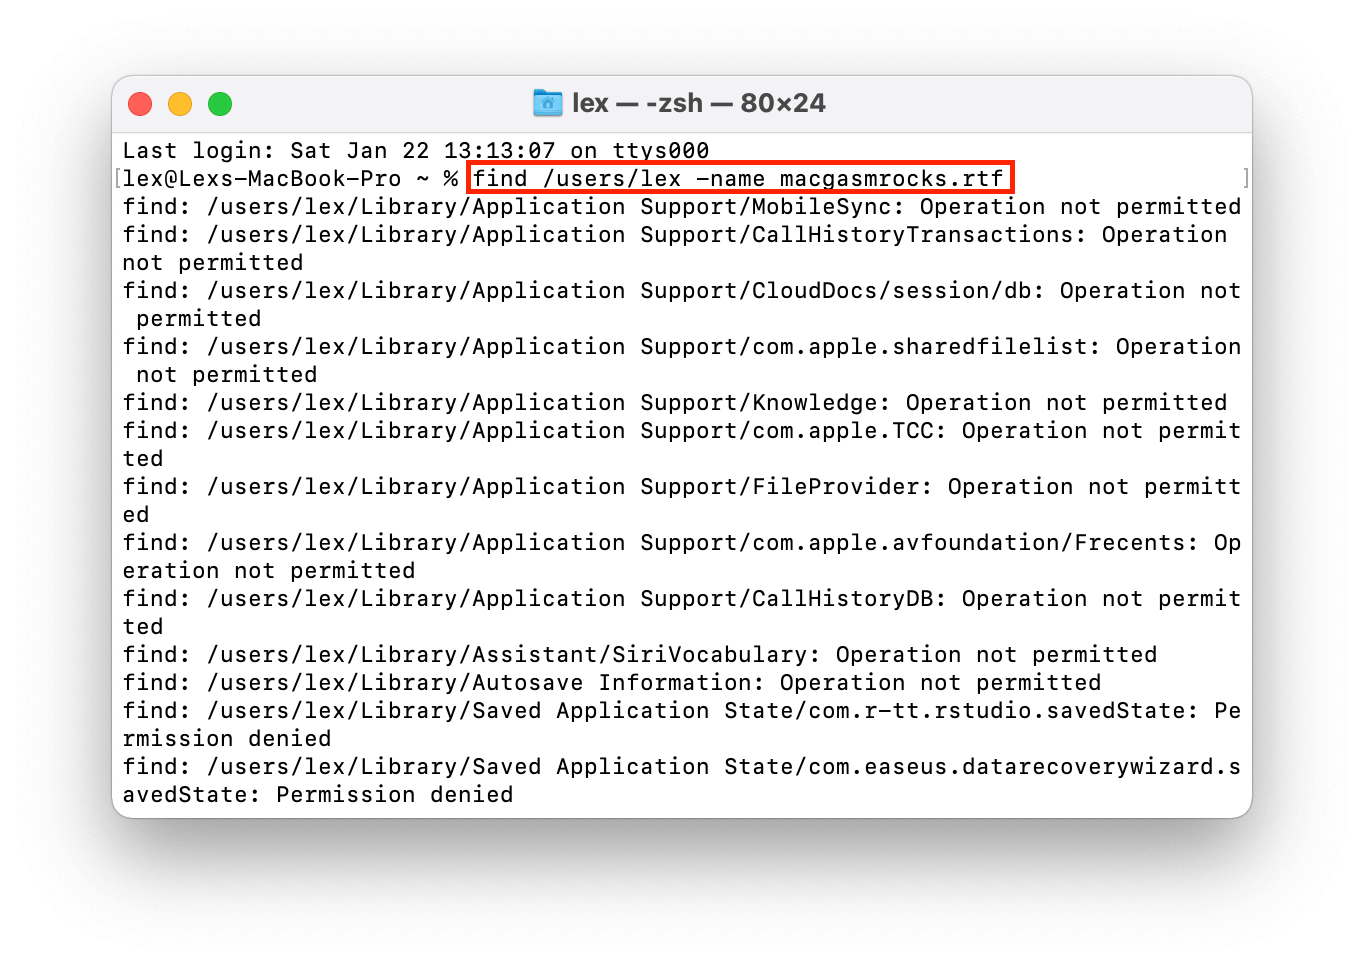
Use the “find” command to locate files in specific directories by file names. What makes this useful is that you can specify a directory further up the file structure to search through more locations. The Terminal window will then display the exact path for that file. For example, this command will search for texttxt.rtf in my entire home directory:
find /users/lex -name macgasmrocks.rtf
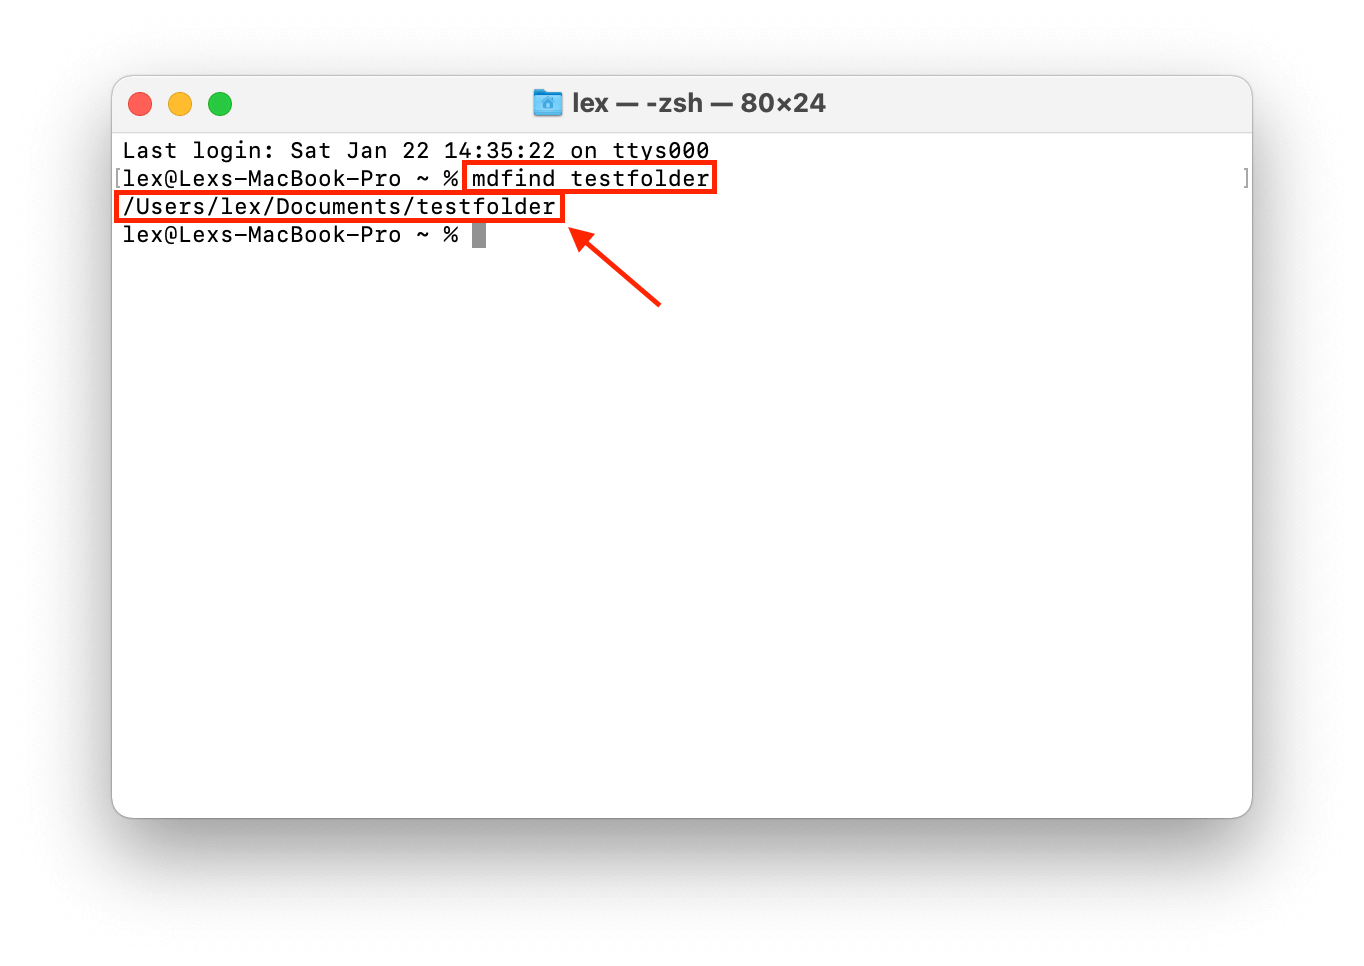
Use the “mdfind” command to search for files and folders. Like the “find” command, Terminal will help you find file and folder locations on a Mac and print the exact path. For example, let’s search for a folder:
mdfind testfolder
For files, you’ll need to include the extension in the command, such as .pdf, .jpg, etc.
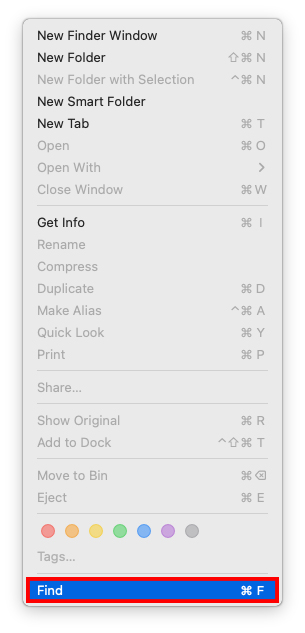
Finder is macOS graphical user interface organization system – Apple’s version of Windows Explorer. It’s fairly straightforward to navigate through Finder, but did you know that it also has an advanced search bar? Finder Advanced Search makes searching for files on Mac efficient. To access it, open Finder, then on the Apple menu bar, click File > Find .
Underneath the bar that says Search: This Mac, you’ll see two dropdown menus. On the left dropdown menu, you can choose a “condition” – in other words, what parameters you want to use to narrow your search.
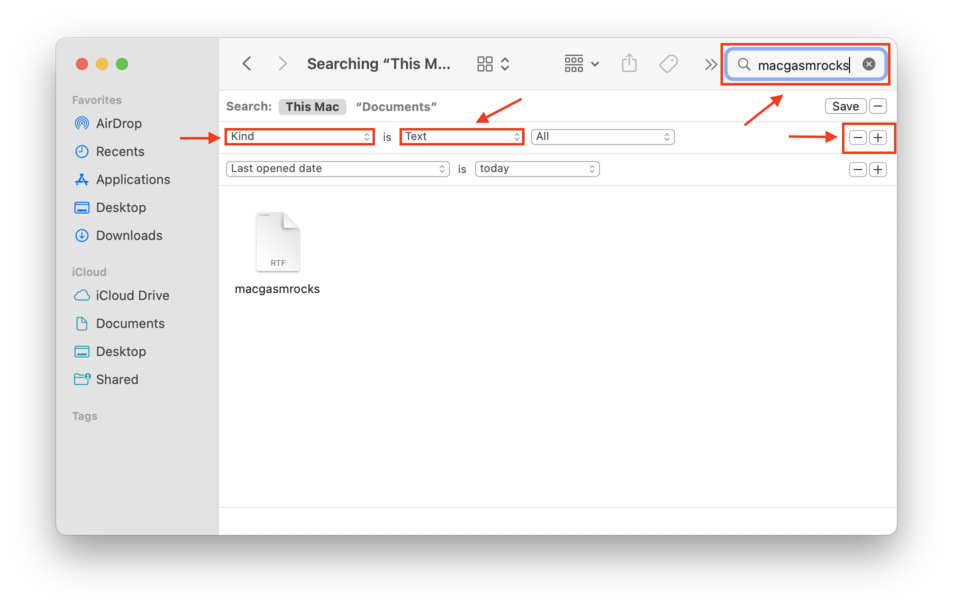
To its right, you can define that condition. For example, you can set the condition to “Kind” using the left dropdown menu. Use the right dropdown menu to choose “Text”, so you will only get search results that are text files. You can click the + button on the top-right corner of the window to add even more conditions and use these parameters in conjunction with the search bar for a laser-focused search.
Spotlight is another intuitive native macOS function that lets you search for different types of files and apps. It’s very easy to pull up Spotlight – just press (CMD + Space). Once Spotlight is on-screen, you can proceed to try out different “queries.”
A query is a request from the user to the computer for specific data or information. Here are the most useful ones for Spotlight:
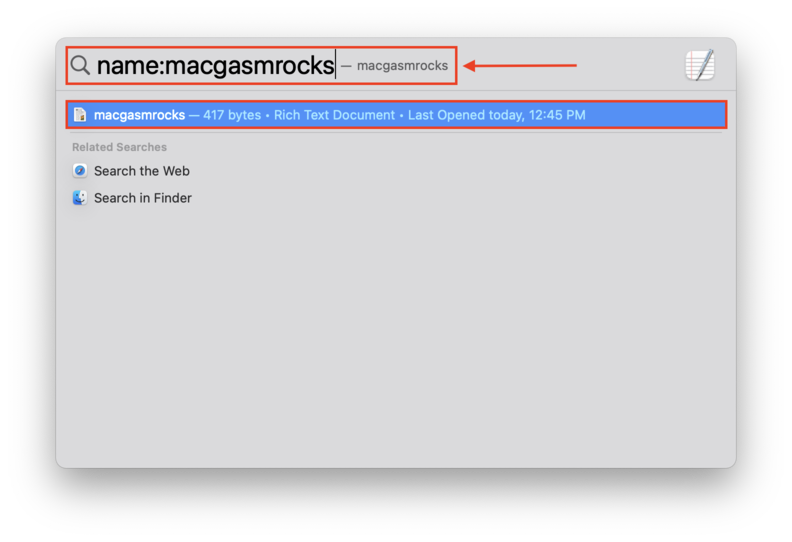
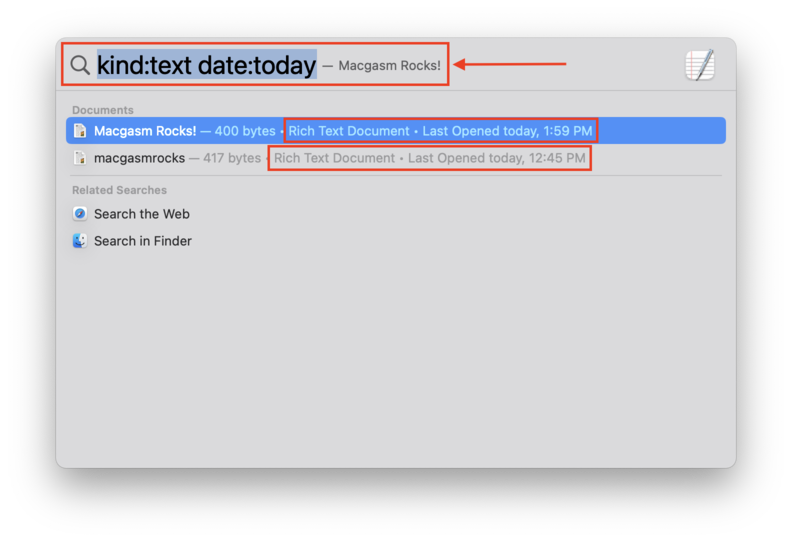
The cool thing about Spotlight queries is that you can “stack” multiple queries to selectively narrow down your search. For example, kind:text date:today.
If you’ve tried everything we discussed in this article and you still can’t find your files – or if you’ve emptied your Trash folder – then it’s likely that they were deleted by accident, by corruption, or by a nasty virus.
Below, we’ll show you the best ways to recover deleted files.
macOs’ Trash folder is the equivalent of the Windows trash bin. This is the first place to look for your recently deleted photos, documents, videos, etc. The easiest way to open it is by clicking its icon on your Dock.
If it’s missing from your Dock for some reason, you can use the Finder “Go to folder” function. Here’s how:
Step 1. Open Finder.
Step 2. On the Apple menu bar, click Go > Go to Folder…
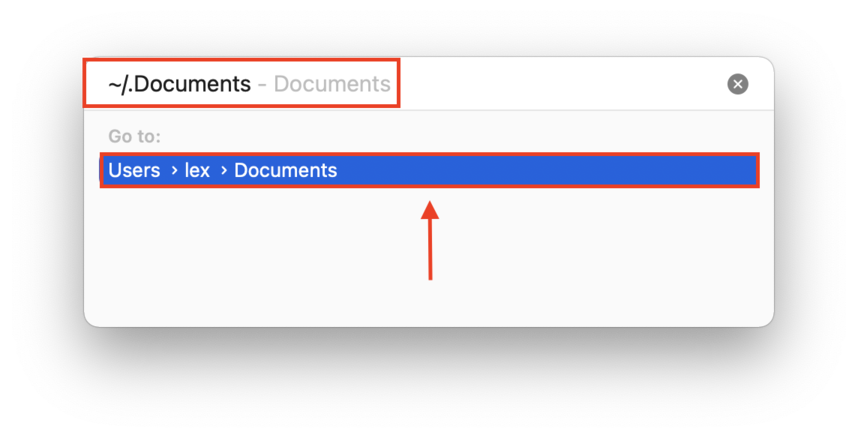
 Step 3. On the window that appears, there will be a text field. Type “ ~/.Trash ” without the quotes, then press enter.
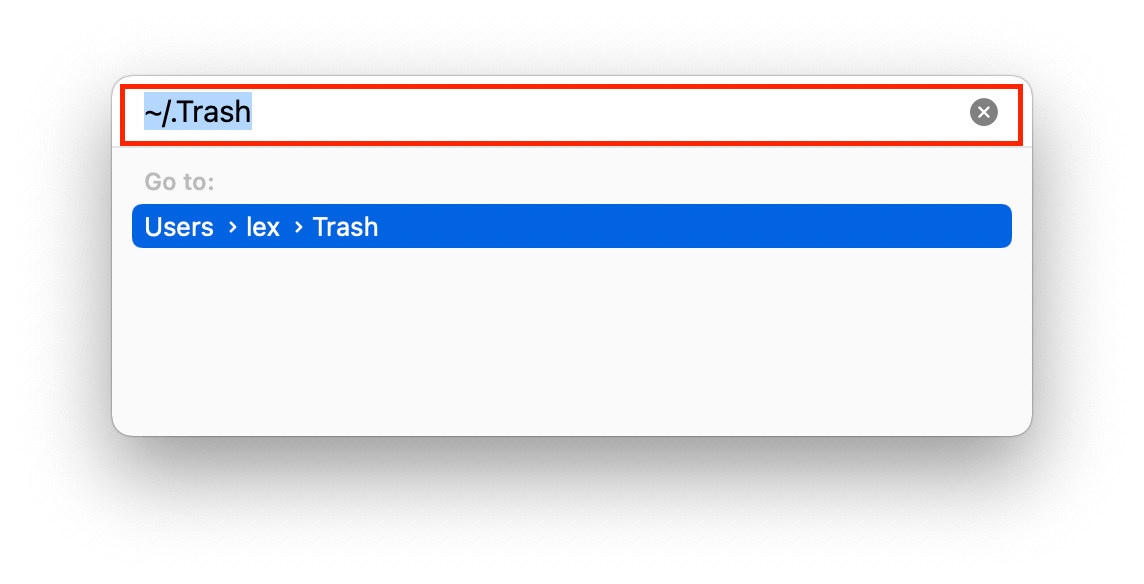
If you find your files in the Trash folder, you can right-click them then click “Put Back” to return them to their original location.
If your deleted file is no longer in the Trash folder, you’ll need to use data recovery software to extract it directly from your Mac’s file system. For this article, we’ll be using Disk Drill. It’s fully optimized for the latest macOS and supports almost every single Mac-based file that exists.
It’s also easy to use, making it perfect for beginners. In the guide below, we’ll demonstrate how to use Disk Drill to restore your deleted files.
Step 1. Plug in an external storage device if you’re recovering files from your main drive.
Step 2. Download and install Disk Drill.
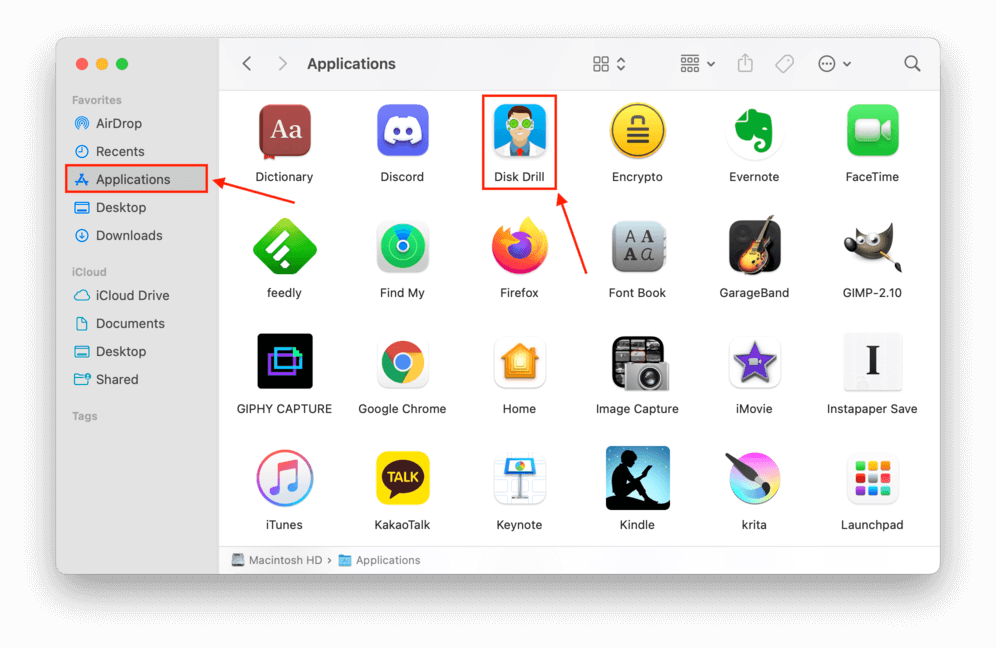
Step 3. Launch Disk Drill by opening Finder > Applications > Disk Drill .
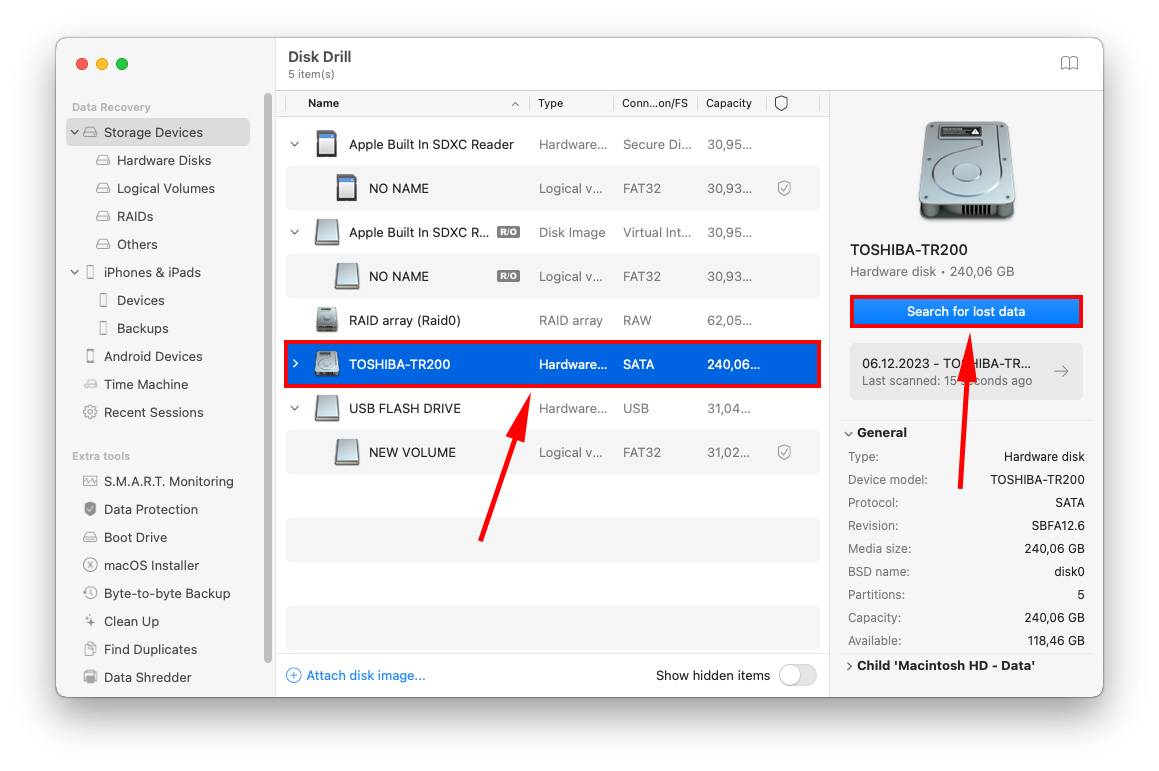
Step 4. Select the drive where your missing files were last stored, and click Search for lost files to proceed with the scan.
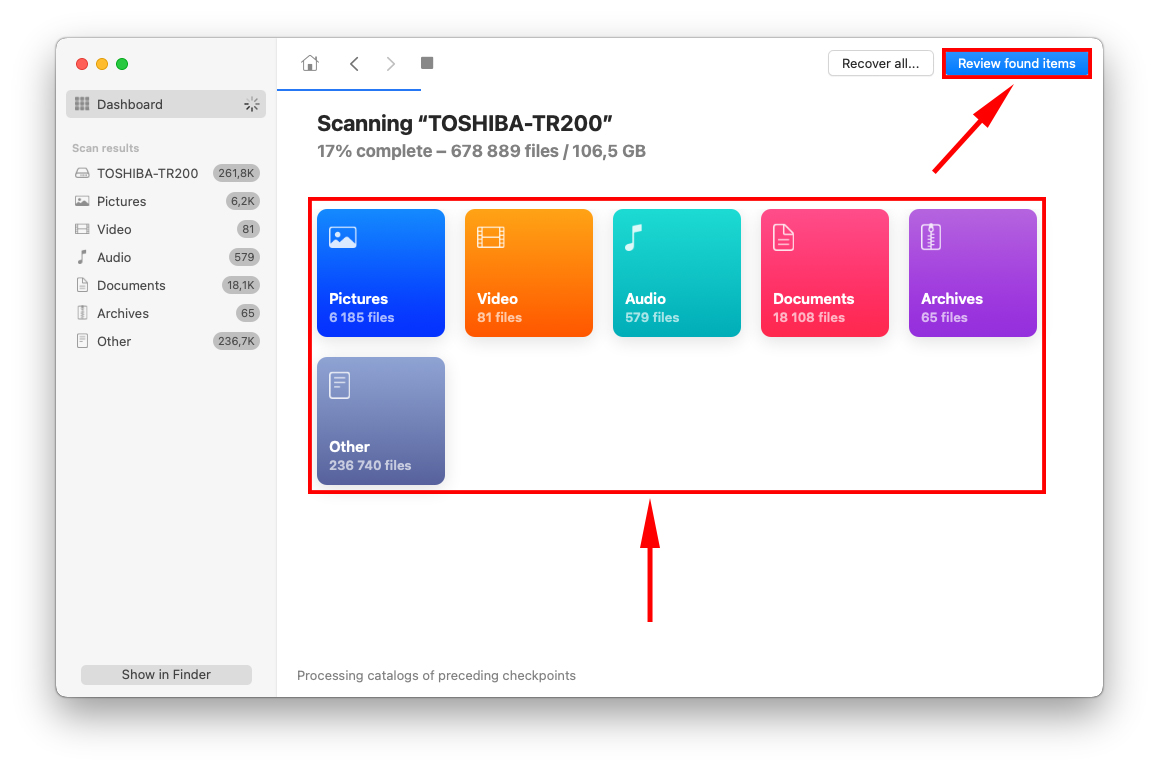
Step 5. Even if Disk Drill hasn’t completed its scan, you can start browsing through found data by clicking one of the file type boxes. Or you can wait for the scanning process to complete then click Review found items .
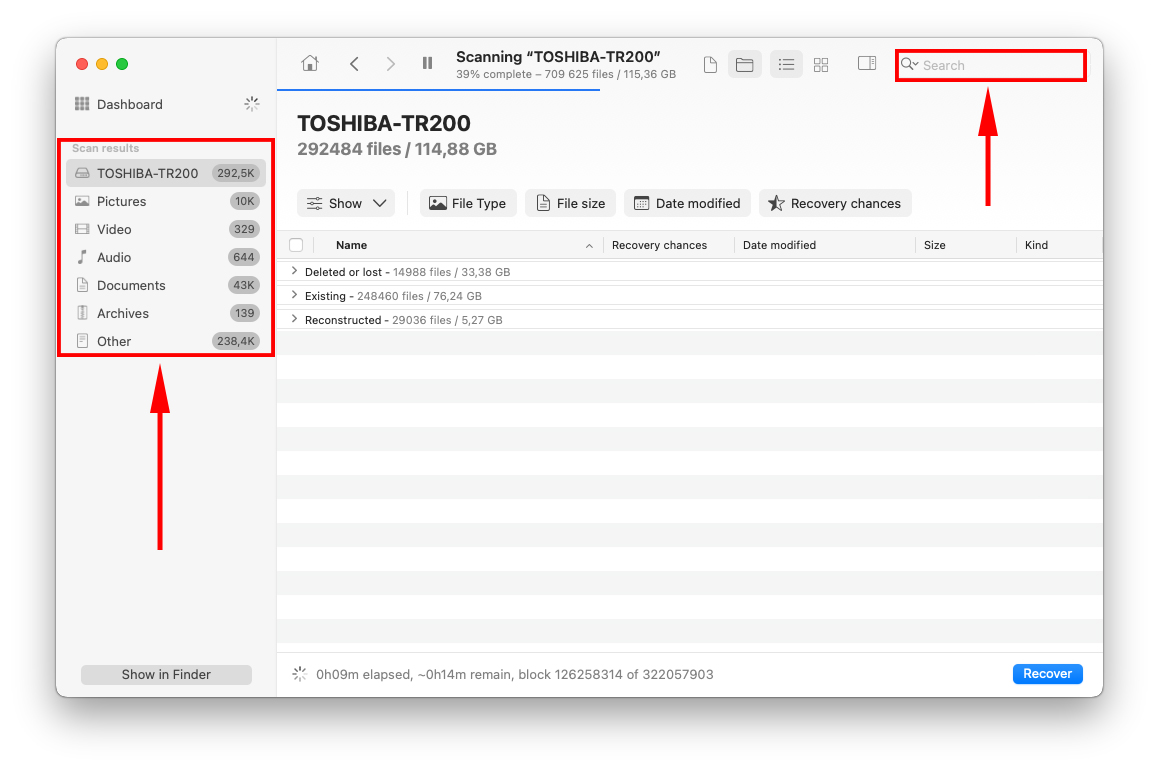
Step 6. You’ll be greeted by a list of found data that continues to populate until the scan completes. You can browse through the results manually or you can narrow your search by using the search bar on the top right corner of the window, or by using the file type selection sidebar on the left.
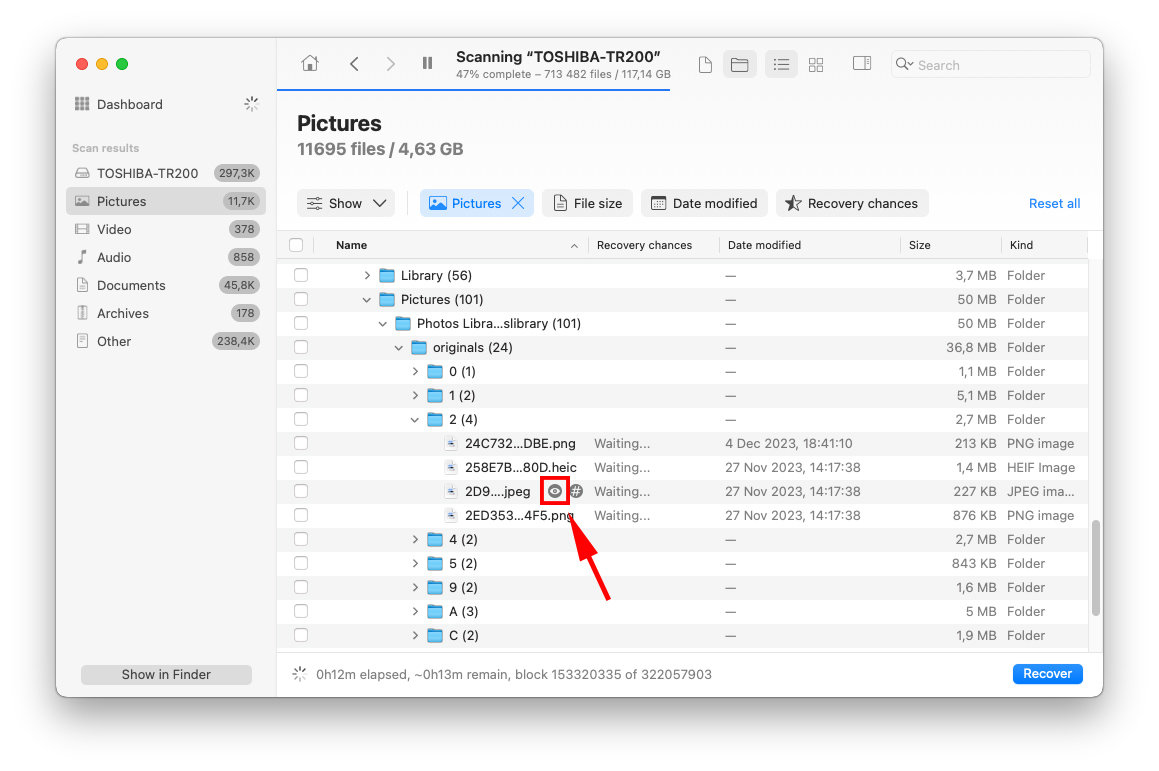
Step 7. You can preview any file by hovering your mouse pointer beside the file name and clicking the eye button that appears.
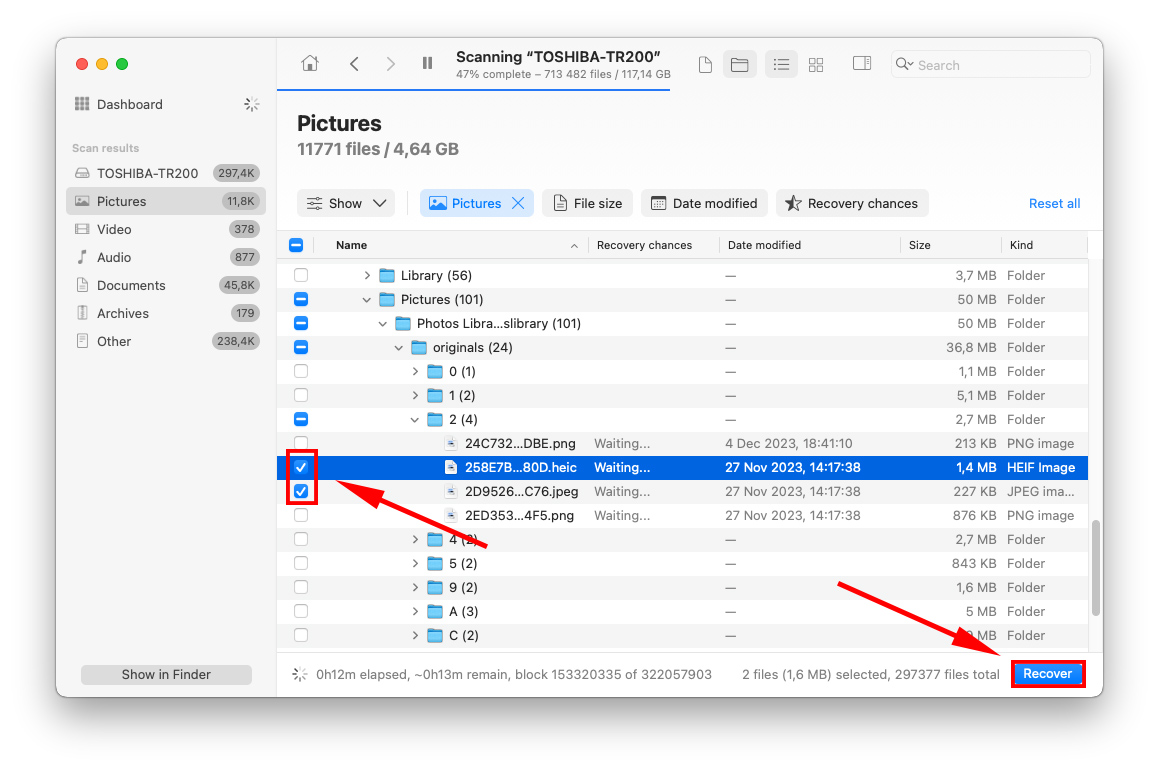
Step 8. To select the files you want to recover, tick the checkboxes to the left of the file names. Finally, click Recover .
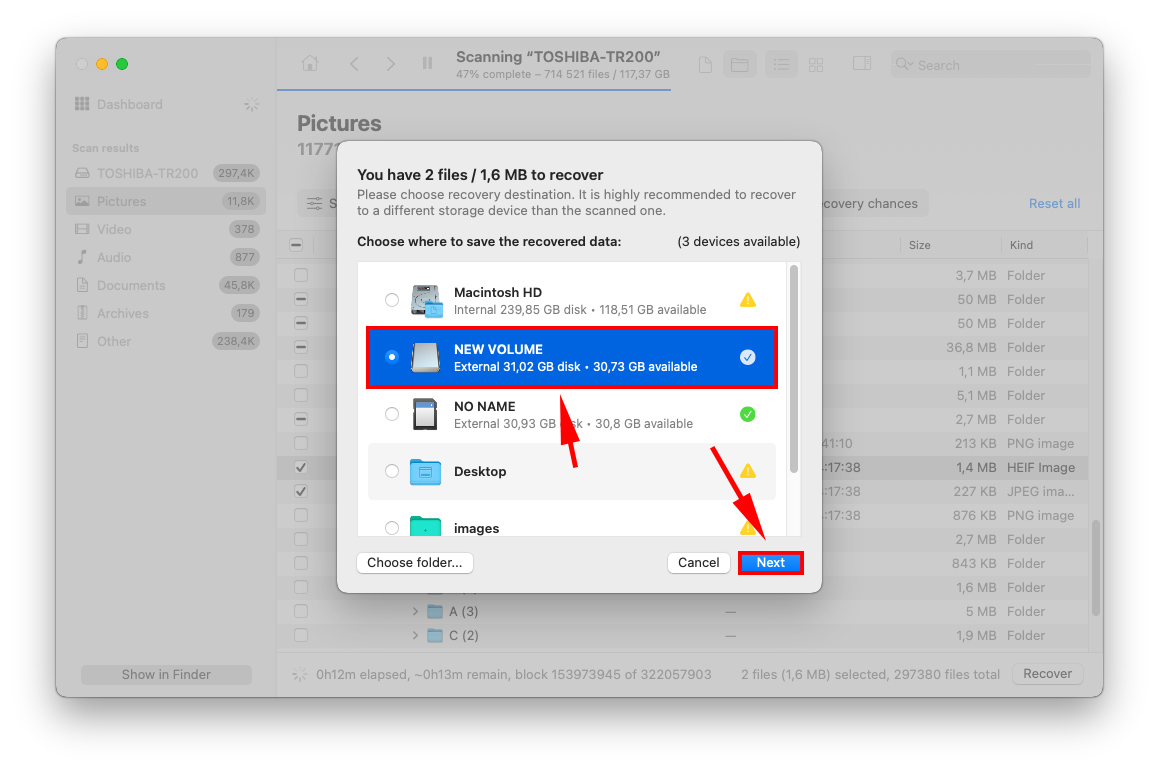
Step 9. On the dialogue box that appears, use the dropdown menu to choose where you want to save your files. It’s always a good idea to save them to another storage device if you think the drive you’re scanning is corrupted.
Disk Drill Basic (the free version) doesn’t offer free data recovery. However, you can preview as many files as you want – this is super important for figuring out if you can actually recover your files using DIY recovery software.
Whenever you delete a photo, it’s automatically sent to the Recently Deleted album in your Photos app. It stays there for 30 days by default and automatically erased (permanently) after that duration.
Photos in the Recently Deleted album don’t show up during searches, so it’s worth checking here if the other methods didn’t work for you, even if you don’t remember deleting your photos.
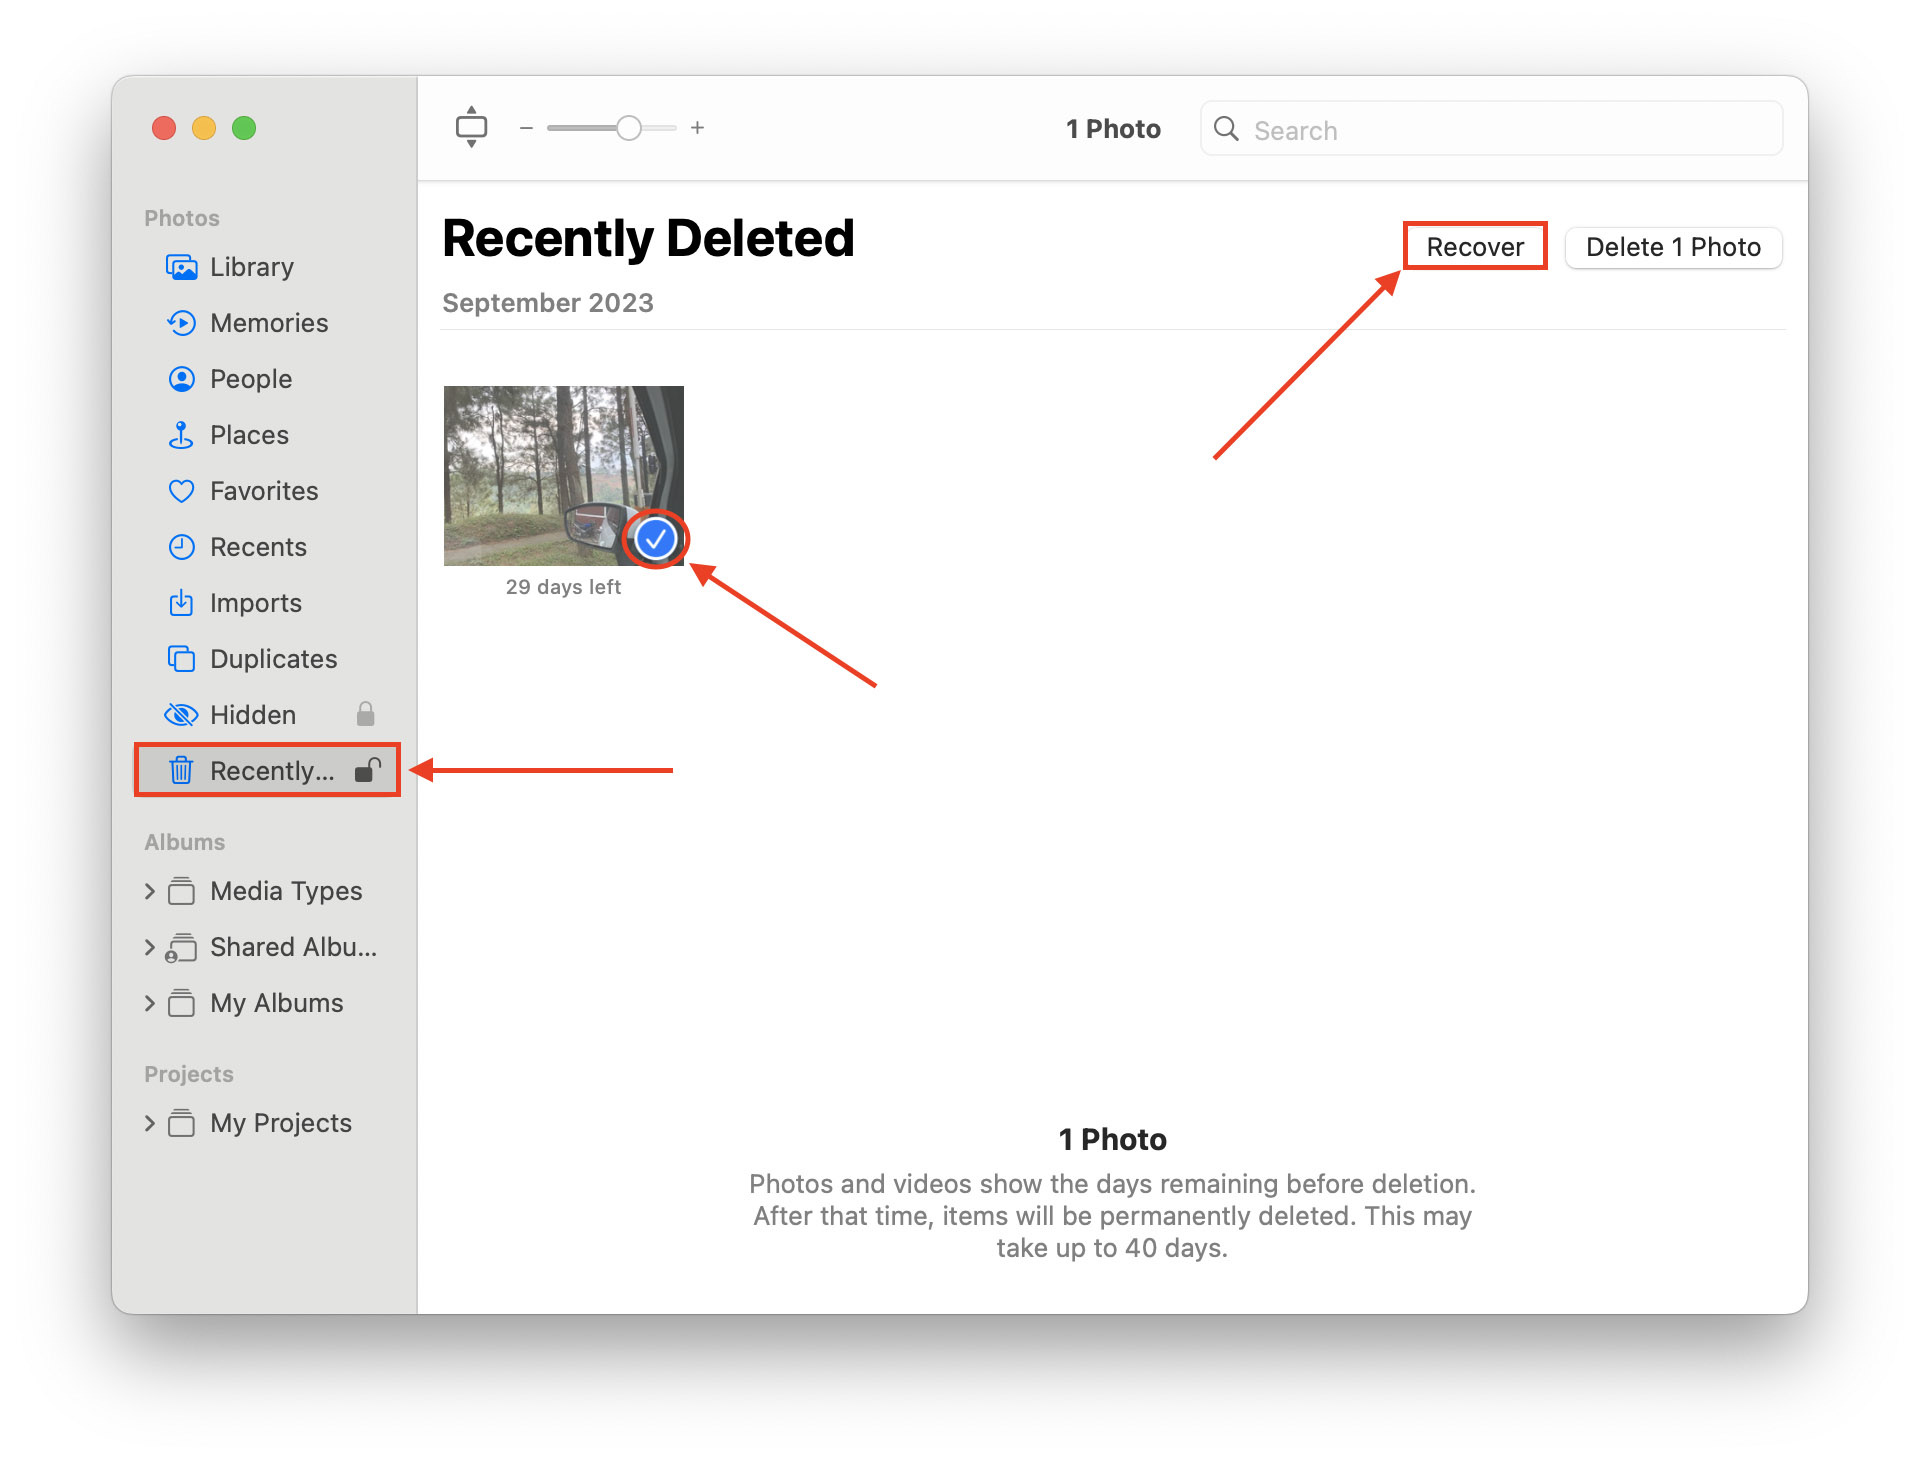
To check the Recently Deleted album in the Photos app, open the Photos app and click Recently Deleted in the left sidebar. If you find your photos, click on them to select them and click Restore . They’ll be returned to their old location.
If you have iCloud enabled for your Photos (or you uploaded your photos and managed them there), try checking the Recently Deleted album. As with the Photos app, deleted iCloud photos are only kept for 30 days and permanently erased after.
To check the Recently Deleted album on iCloud:
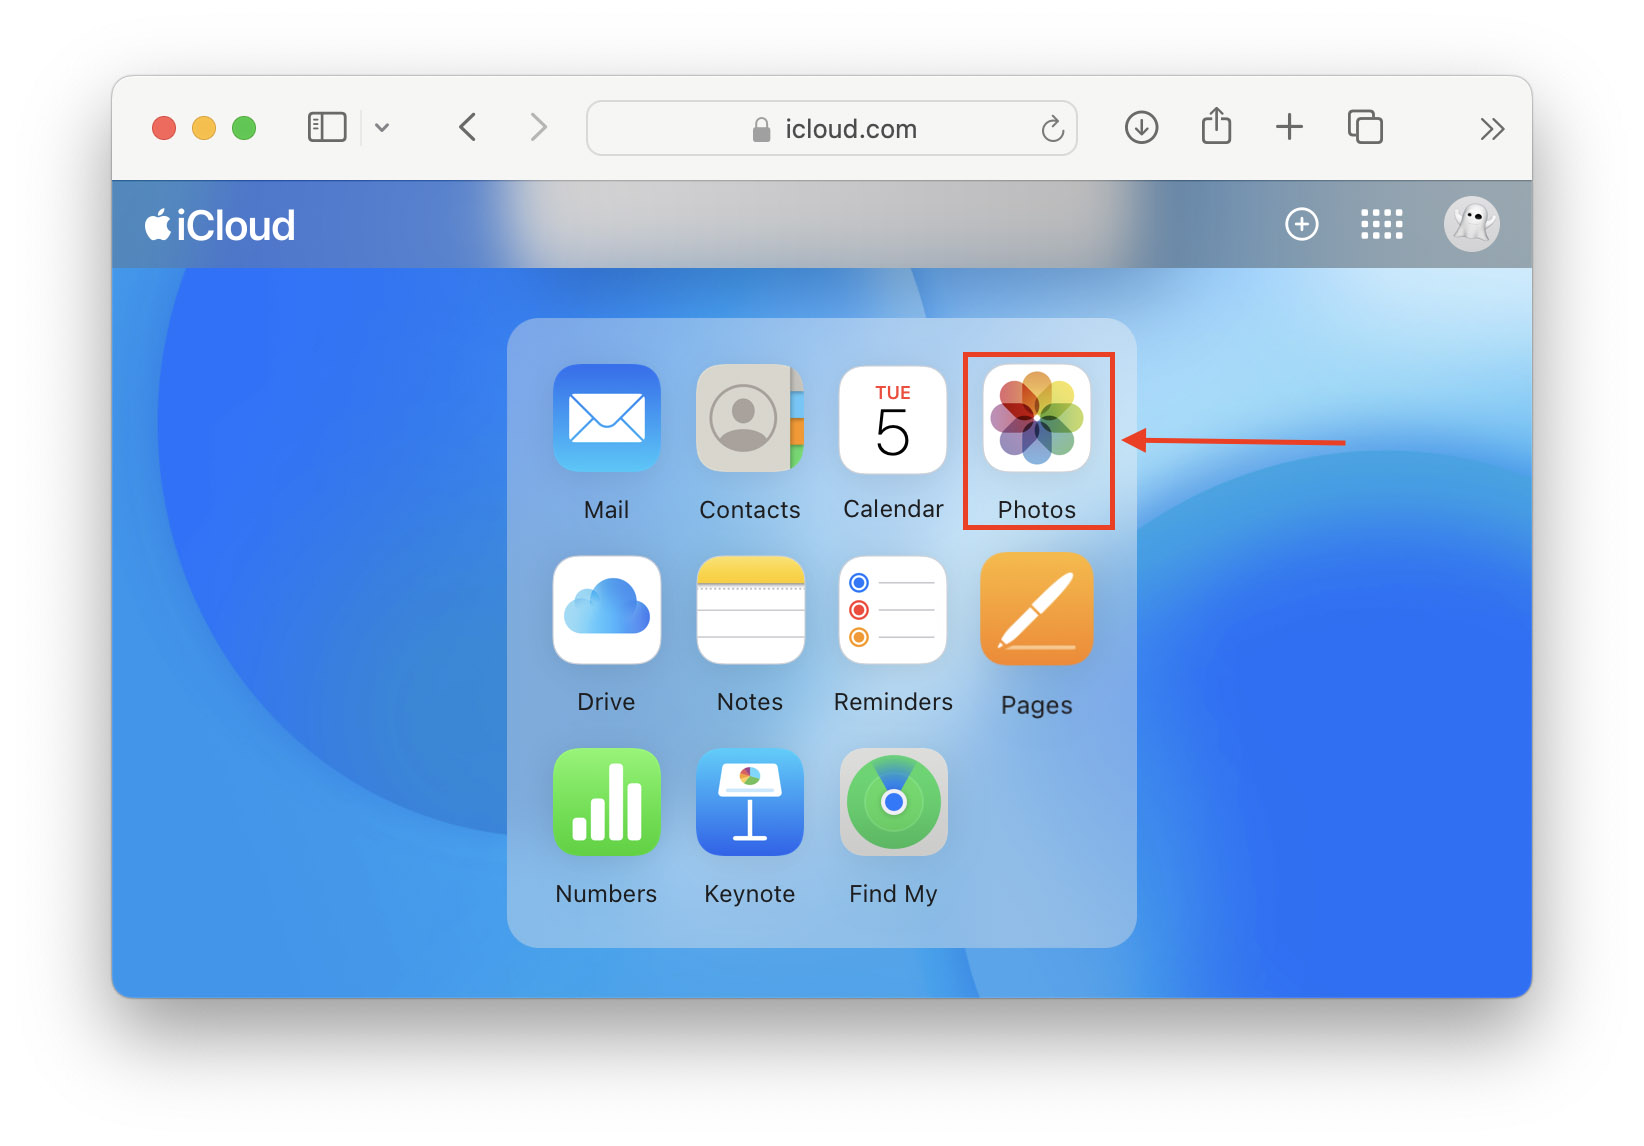
Step 1. Log into iCloud.com and click on the Photos app icon.
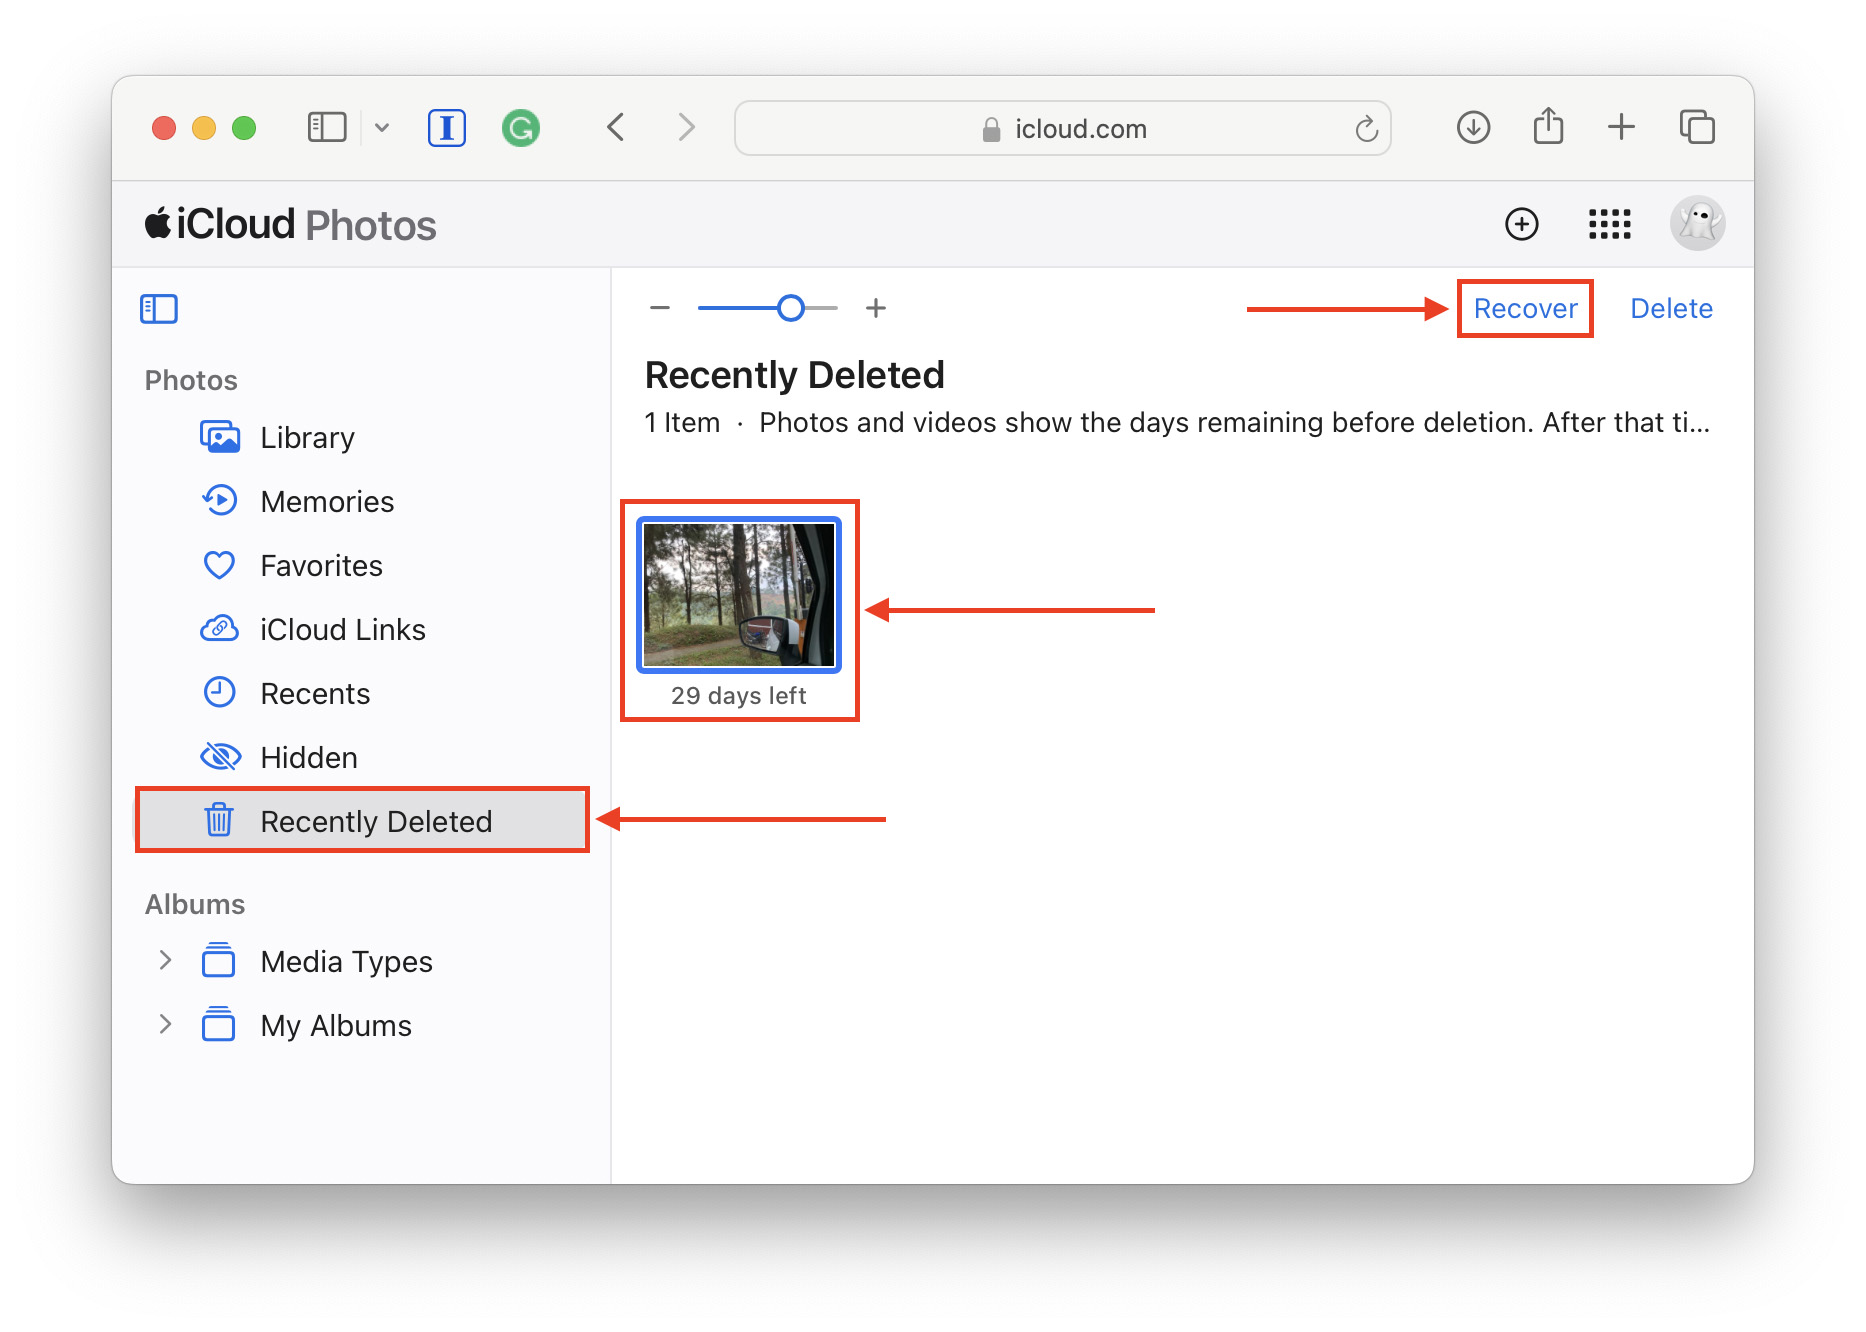
Step 2. In the left sidebar, click Recently Deleted . If your photos are here, click on them to select them and click Restore . They should be returned to their last location.
Tip: Sometimes, bugs appear during the synchronization process due to an unstable connection, software issues, or app conflicts. This may cause your photos to not appear momentarily on your device. Check the Photos page on iCloud.com to check for the uploaded copies of your missing photos.
The macOS navigation system was designed to be a tool for users to manage their files and folders efficiently. Once you get used to employing the different methods we mentioned in this article, you’ll find that you work way faster, spend less time mucking around the file system, and ultimately get more done.